Wednesday, July 24, 2013

{getting crafty} DIY Headband Organization (and Tutorial)


I swore I'd never be one of those parents who decked their daughters out in tons of flowers and bows.  


But that was before I had a daughter.


Now, I want her to have ALL THE HAIR DECOR.  It's a difficult feeling to explain, really.


But, I needed a way to organize these things so I can see each one. Cue the Pinterest search. I found several methods that involved wrapping scrapbook paper around various canisters, and this is just my take on those.  This craft is easy enough for beginners, and I was able to make both canisters in about 45 minutes. 

Here's the tutorial if you'd like to play along.


{what you'll need}
  • empty food canisters with lids (I used oatmeal and soy protein containers)
  • scraps of fabric
  • quilt batting (I had medium loft)
  • ribbon
  • other embellishments (buttons, gems, brooches, etc)
  • hot glue gun


{what to do}

Start by wrapping your clean, empty canister in quilt batting. Cut a strip long enough to wrap around, and make it just a bit shorter than the height of your canister, so the lid will still fit.


Secure with hot glue.


Repeat this step with your fabric, but make it just a bit longer than your canister (see picture). A half inch on either side should do.


Secure with your hot glue, wrapping extra length around the top and bottom of your canister, as pictured.


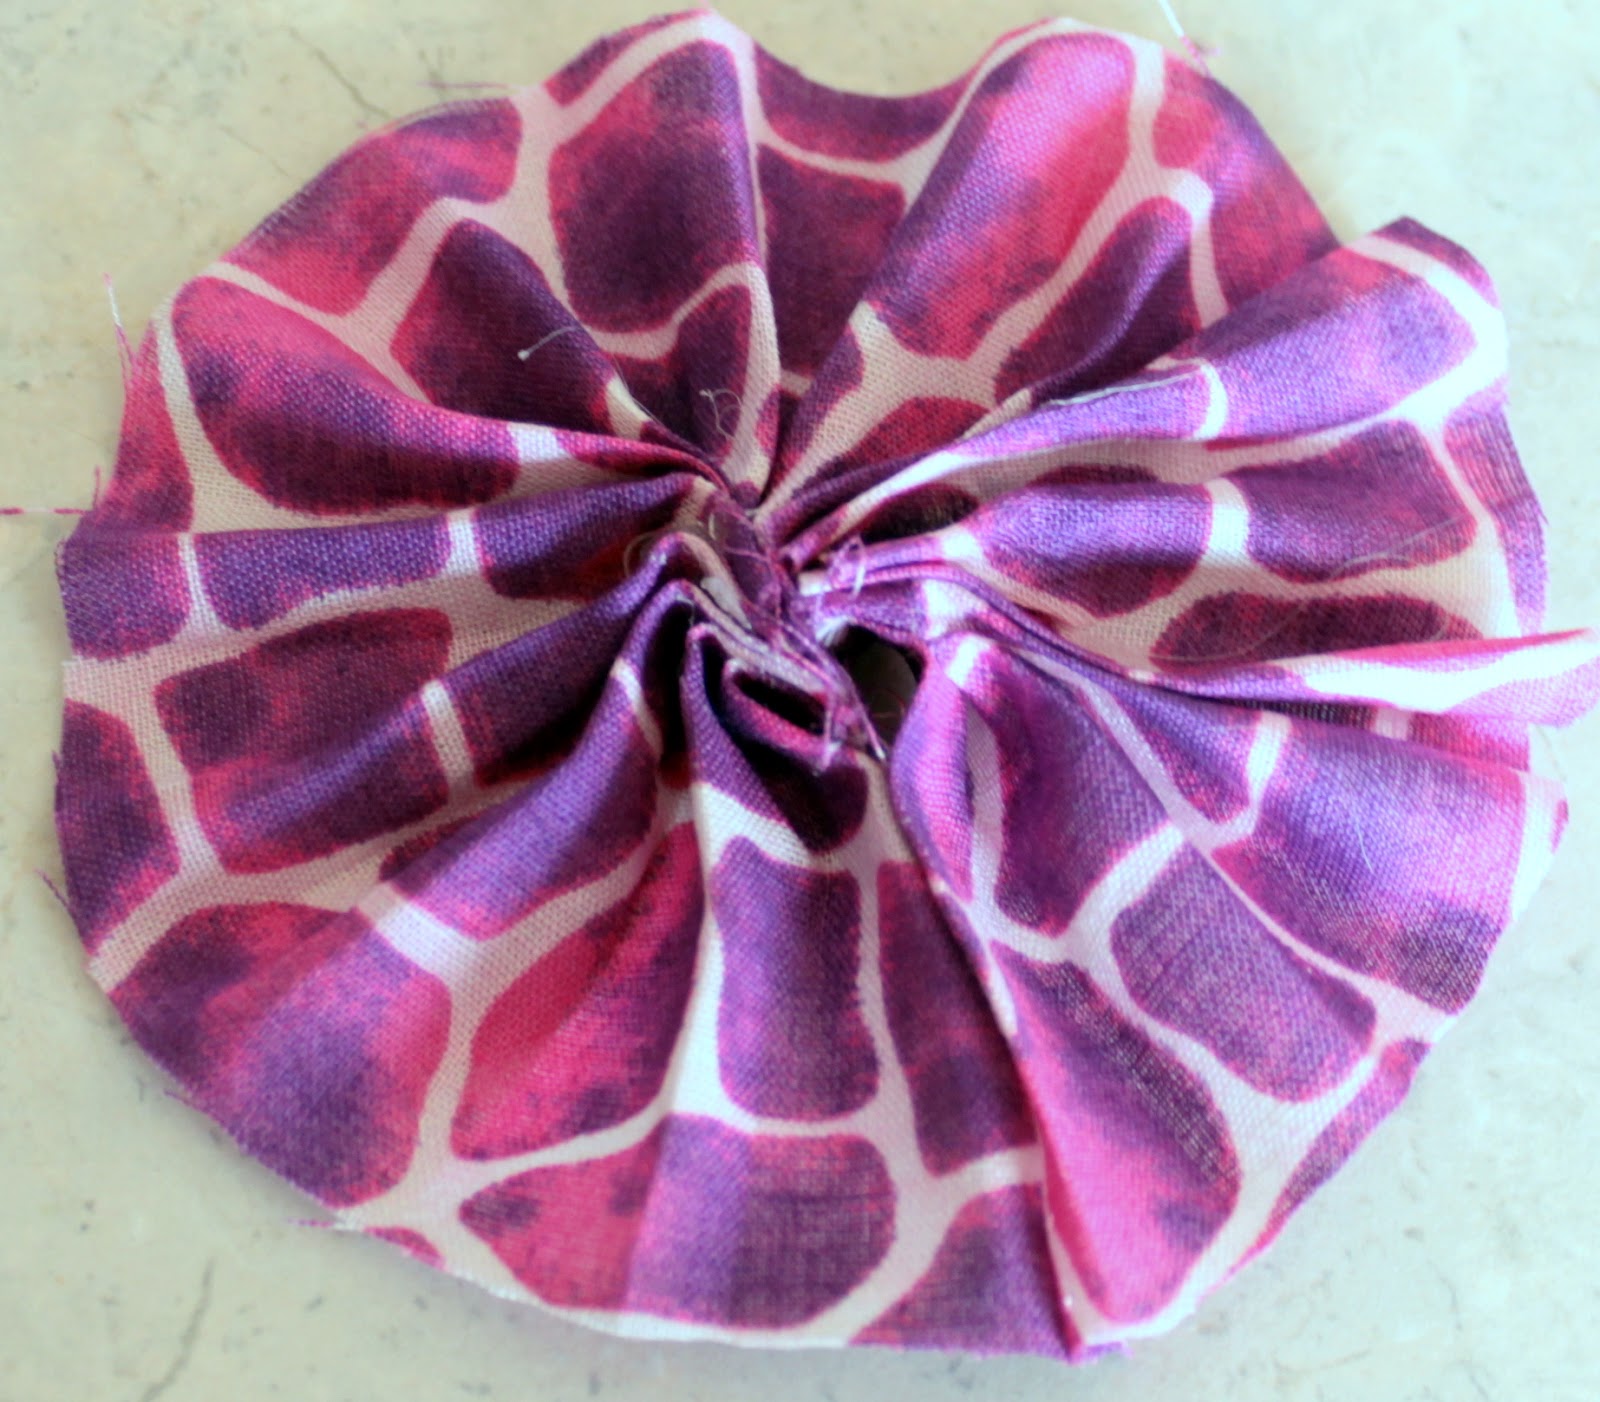
Time to decorate the lid. Start with a strip of fabric as wide as the radius of your lid (see photo). Mine was 30 inches long. If you don't have 30 inches, you can always attach two or more strips while you work.

That really faint pencil line is the radius.


Fold your fabric to make a pleat on one end, making the top of the pleat wider than the bottom. Secure at the bottom with a drop of hot glue.


Make a second pleat on top of the first. Secure again with glue.


Just keep doing this. 


Eventually you'll have a circle. Trim that extra part off of the top and tuck the edge under.


Take the remainder of your fabric strip and trim off a good 1.5 - 2 inches so you have a narrower strip.


Start a fan fold at the end of one strip. Stop after every fold to put a small dab of glue in each little pocket on ONE SIDE ONLY, as pictured. 


In my example I'm using the left side. You can see a small dab of glue toward the top, in an open pocket.


After several folds, your strip should look like this. I made 15 folds.


Once you've made several folds, bring the open ends together and secure them using your hot glue. 


Glue this on to your big circle, and glue the big circle on to your lid. 


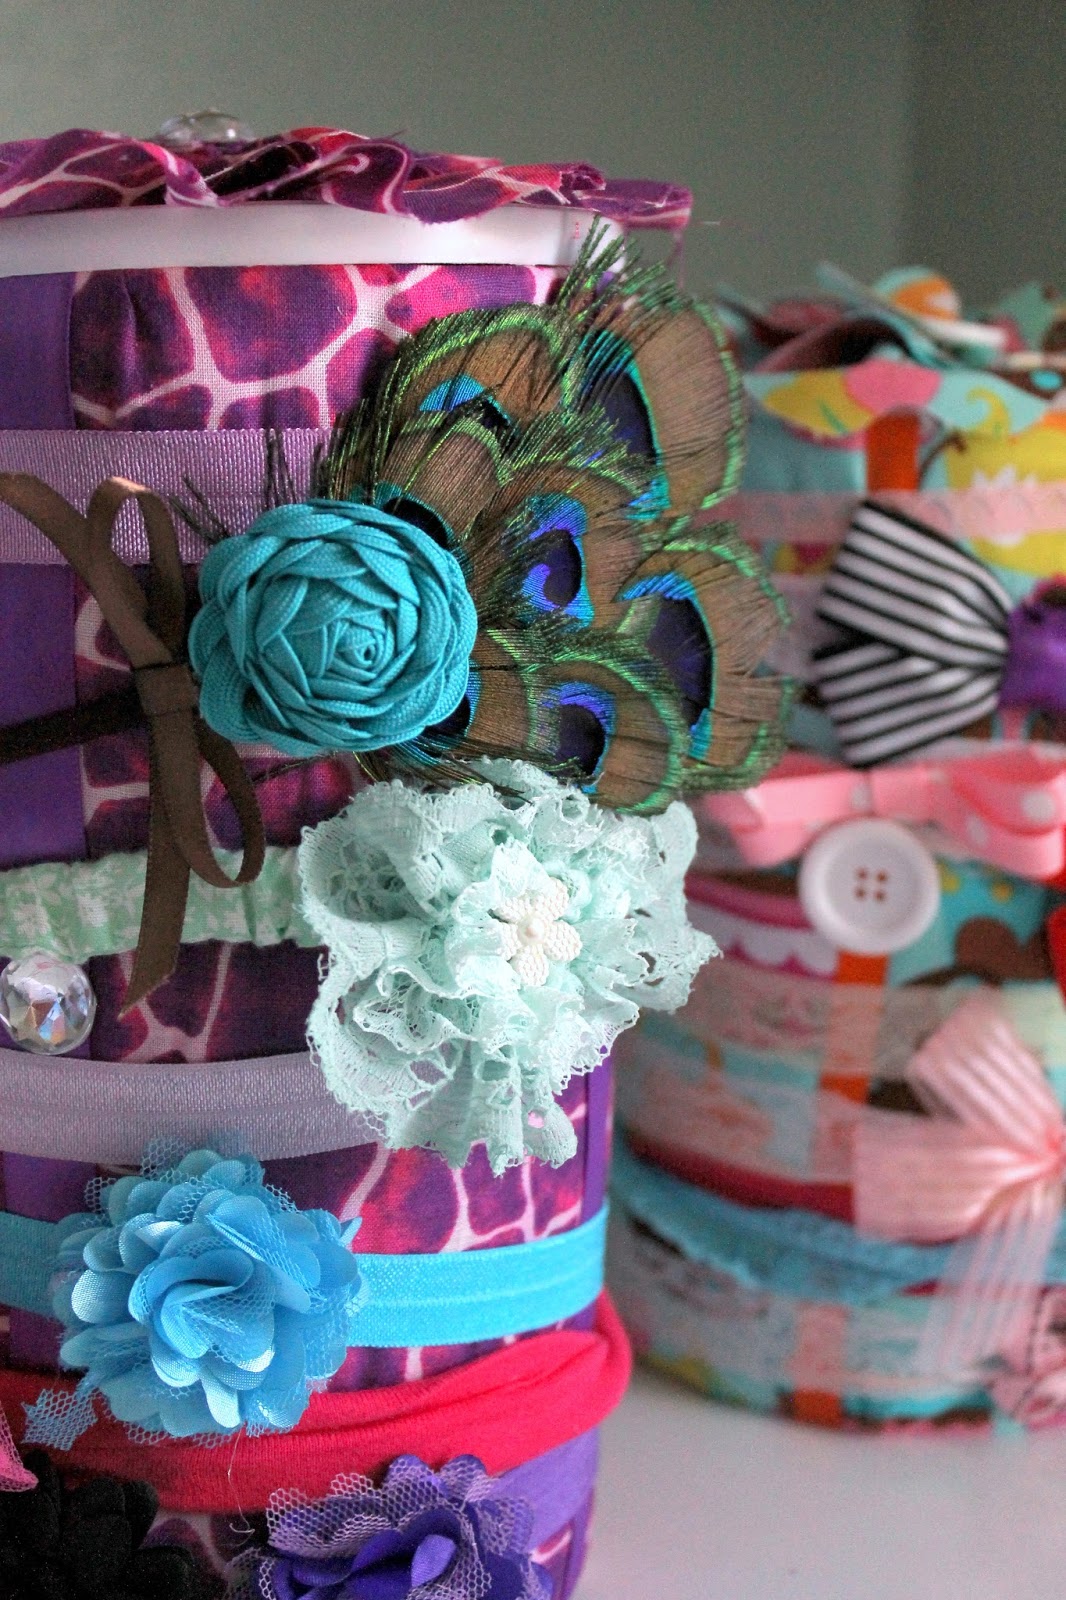
Embellish the center.


Almost done!


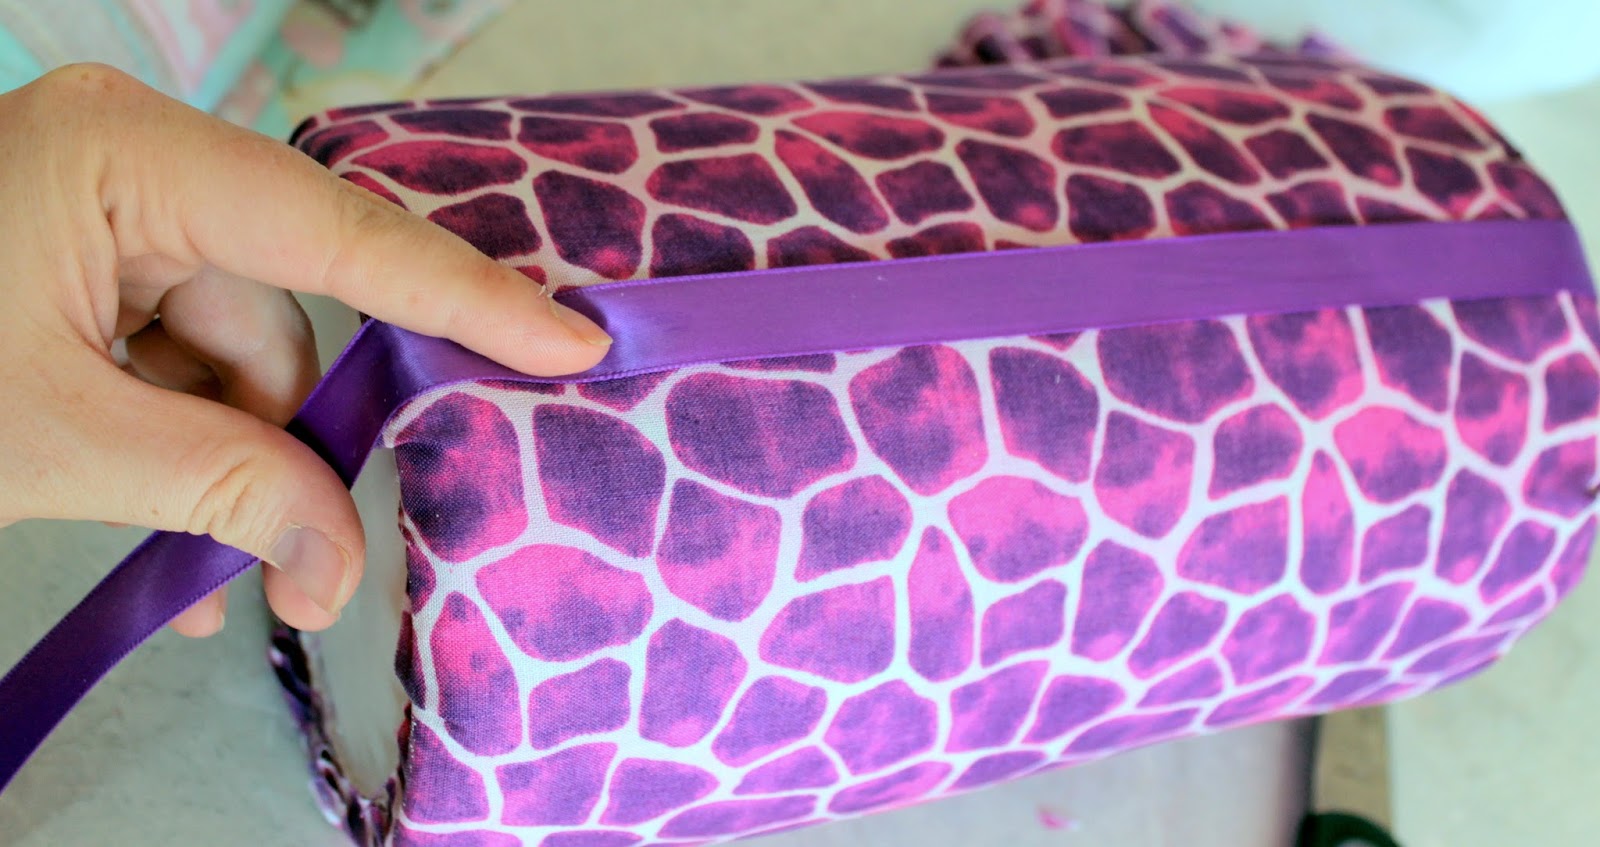
Measure a strip of ribbon about an inch longer than your canister. Cut 4 strips this length.


Might as well cover that seam while you're at it. 


Wrap one end of the ribbon over the top of the rim and secure it down with glue. Pull it taught over your canister, wrap the other end around the bottom, and glue.


Repeat this step with your remaining ribbons, gluing them at approximately 12:00, 3:00, 6:00, and 9:00 on the canister.


Besides covering the seams, these are great for pinning barrettes and hairpins.


Add another embellishment on the center of each ribbon strip, and you're done! 


You can wrap headbands around this, pin clips to the ribbons, and use the inside of the canister for small hair ties or other accessories. 


Or in my case, all the other headbands I didn't have room for.


Flower variation for the lid:  

For a different look, I traced my lid on to the wrong side of my fabric, then cut out random cloudlike shapes to make a piece that's larger than the lid. 


I did this again, but made my second little cloud about the size of my lid. 

Repeat until you have 5 little cloud shapes, each one smaller than the last. 


Layer them on your lid, starting with the largest cloud, and finishing with the smallest, gluing each layer down as you go. Embellish the center, and you're finished. 


Now, throw some headbands over these puppies and get ready to feel a bit more organized!


Wednesday, July 17, 2013

{Sewing Adventures} The perfect Baby A-line Dress.


Happy {late} 4th of July!  


We had a blast going to a parade. 

This one has become a family tradition; I've been going since I was a little girl.  Z got to experience funnel cake, marching bands, trucks, bagpipes, even elephants. He loved the whole experience.

We also got to spend time with family, barbecue, and drive home through lots of traffic while fireworks went off in the sky above our car.


And of course LJ needed something to wear.

The Perfect Baby A-line dress from Tie Dye Diva Patterns was...well, perfect!
Bonus: the instructions were very easy to follow. I made it in Riley Blake red and blue chevrons, and some leftover material from Z's new big boy bedding.


Toss in a matching headband,


 add coordinating bloomers,


And of course a t-shirt for big brother, 


And they were ready for their closeup.


Tuesday, July 16, 2013

I'd like to talk for a minute about breastfeeding.

So I always used to joke that I loved breastfeeding because it requires the least amount of work, but as I write this post at 2am while pumping, I know that to no longer be true.

Breastfeeding is hard. And I feel like not enough women talk about how difficult it can be. So if you're reading this right now and you're struggling too, there are two things I want you to know.

1. You are not alone. 
And
2. You're doing something amazing for your baby, and it's worth it. 

Okay, I lied. There are 3 things I want you to know. 

3.Things will get better. They will. 
It might not be a matter of days, or even weeks. You might work your tail off for months, but I promise you, things WILL get better. Then one day you'll feel like you just blinked, and your sweet baby is an incredible child with a personality you could never have imagined, and all the struggle, which once seemed neverending, will be forgotten. 

I say these things not from a place of judgement to those who were unable to breastfeed or chose to stop, but from a place of understanding that it can be a huge struggle, and a place of encouragement to those who feel like they may be alone. I say them because I know somebody out there needs to hear them. If you're struggling with breastfeeding, know that you're not alone. This is not abnormal. Your body isn't defective.

I'm also saying these things because right now I need to remind myself just as badly. I struggled at the beginning to be able to breastfeed my son. Maybe eventually I'll have time to write out our story. Emotionally, those first two weeks were quite possibly the hardest of my life. I know that last sentence will only make sense to other mothers, especially those who've struggled. But we learned, and things changed, and I breastfed him for two years. And. It. Was. So. Worth. It. When my daughter was born, the first two weeks seemed like they'd gone great! I was so happy that our breastfeeding relationship was going to go more smoothly. Little did I know, she has multiple anatomical issues that prevent her from getting enough milk.

So I pumped. After every feeding. Day and night. And I continue to do so. She is nearly 6 months old and I continue to do so. I continue because of all the amazing ways breastfeeding benefits both myself and my baby, as well as the ways it promotes toddler development. and because I know someday it will get easier. We may never have the breastfeeding experience I hope for, but things won't be this difficult forever, and right now I'm at peace with that.

If you're still struggling, or want more information about breastfeeding, find a local La Leche League leader and contact them. They're always willing to help, and never judgmental. The leader who helped me with my daughter was able to tell me more in one minute than I had learned from two months worth of visits to our pediatrician, 8 or 9 different lactation consultants, and two different otolaryngologists.


Friday, June 28, 2013

{getting crafty} DIY Baby Barefoot Sandals Tutorial {10 minute craft!}

Disclaimer: I was lazy and took photos with my iphone. I apologize to anyone reading this for the out of focus, grainy images, and I apologize to my DSLR camera- next time I'll dust you off and let you do your thing.

 So,  in college I worked at an amazing summer camp.

Every year, the staff got at least 3 different new t-shirts, plus our choice of leftover shirts from previous years. I have a collection of probably 25-30 tees just from this camp.


I don't wear t-shirts as much these days, but have saved each and every summer camp shirt to make a t-shirt quilt. You know, when I get around to it. Someday.
 

But I digress. This isn't about t-shirts or summer camp, no matter how awesome said summer camp may be. (But seriously, if you're from Colorado and have kids who are 8 or older, you're neglecting them if you don't send them here.) But you'll see why the t-shirt story is important shortly. Anyway, back to the barefoot sandals.


Aren't they adorable?


I discovered this style of baby shoes existed just yesterday, and LJ still NEEDS a pair of shoes to go with her 4th of July outfit, which she'll be wearing in 6 days. They looked easy enough to make, so I looked at a few different methods, and combined them into one that I thought would be super easy. And it was!


Want to make your own?

Here's what you'll need:
An old T-shirt you won't mind cutting
Pen or fabric marker
Fabric glue or a hot glue gun
Pudgy baby feet to put them on.
        And that's it!

{optional}
quilting weight cotton, lace, tulle, or other fabric for your fabric flowers.
pearls, gems, or buttons if you want one in the center of your flower.
pinking shears


First, get your pieces ready.  Lay out your t-shirt and cut off the bottom hem. Then, cut a strip straight across off of the bottom of your tee. Mine was about 1.5 inches wide, but I think I would go with about 1" next time. Set your shirt aside. Now you should have a big ring of t-shirt fabric. Stretch the ring until it starts to curl up and resemble an oversized noodle. Make one cut through the ring so that it becomes a long strip. 


 Next, Measure your baby's feet, or eyeball it if you're brave. You want a strip of fabric that's long enough to circle around from the top of baby's foot, to the sole at the arch. For my 4 month old, I cut 4 inch strips from my big t-shirt noodle. You'll need to cut 6 strips of the same size for the sandals pictured, but you could also cut only 4 strips and this would work. LJ's feet are so tiny, I think next time I'll do only 4 strips. 


You'll also want to eyeball your baby's feet and decide how big you want your fabric flower to be. I went for one that was close to the width of her foot, but it just depends on your preference. You'll want to make a circle exactly the size of the flower you want. I happened to have a spool of thread to trace, but you can use any round object you can find that's the size you want, or you can just draw a circle that size on some paper and cut it out. Using your tracing object, trace out 2 circles on to your t-shirt. These will be the tops of the sandals, where the flowers will attach.

Pieces for one shoe.
Next, grab the t-shirt you set aside, or whatever you want to use for your flower fabric. For my flowers, I used a leftover scrap from the dress she's wearing them with. Trace 18 of your circles onto your fabric (you'll need 9 for each flower). If you're doing a gem/pearl/button center on your flower, you'll only need 16 circles.  Cut out all of your circles. 

You should now have 6 strips of fabric, 2 base circles, and 18 flower fabric circles. Getting those ready was the longest part of this craft, and once you do that, the rest will only take a few minutes.


Grab one of your flower circles and put a tiny dab of glue in the center, then fold in half and pinch until the glue sets.


It should be able to sit on its own and keep a semi-circle shape.


Next, put a dab of glue in the middle of the flower, right at the straight edge. Fold in half again and pinch. 

 
The petal should hold this shape on its own.

Repeat x7 so you have 8 petals made. Leave your base circle and one other fabric circle as is.

 
8 petals, one flower fabric circle, one base circle.


Almost there.

Now lay your base circle right side up (if yours has a right side). Put a tiny dab of glue on the little point of one petal.


Glue your petal down as pictured.

Glue down 3 more petals, until your base circle is covered.


At this point you should have 4 petals glued to your base, 4 loose petals, and your extra circle. Now, glue your second layer of petals down, alternating the placement so the center of your 2nd layer petal covers the crack between the first layer petals, as pictured below.


Add your remaining 3 petals so your flower now has 2 layers with 4 petals each.
At this point, if you want to do a flower with a gem or pearl center, just glue down your gem or pearl. I have neither of those things, so I used a button to give a general idea of what the flower will look like.


If you prefer a fluffier, pom-pom like flower, grab that 9th circle you cut out. 
Fold it in half as before.


 This time, begin rolling your semi-circle from one end.

like I said, iphone pictures.


Finish rolling until you have a cone, the base of which resembles a rosebud.


 Dab a bit of glue toward the end of rolling, to keep it together.

Put a decent amount of glue on the point of your cone, and press the cone down into it until it sets.


Your flower should now resemble the picture below.


To give it some fluff, dab some glue on the top of each of the 4 petals in the second row.

See that dab of glue at 12:00?

Pull each petal up and stick it to that center cone until the glue sets. Voila.


Time to add straps. Flip your flower upside down. 


 I made a line of hot glue down one side, and attached 3 of the straps like this.


Then, reach the opposite end of each strap around in a ring, and attach it on the opposite side of your circle.


Finish all straps and repeat for your second shoe, and you're done!


Now the fun part. Put baby's foot through all 3 rings of the sandal.


Pull the rear one or two straps behind baby's heel. I prefer the look of two straps on the heel.


She's ready to hit the runway!


Some other flower variations: 

This  flower was cut with pinking shears.


Button (or gem or pearl) center.


Remember that lonnnnng strip of tshirt you cut into strips? The remainder rolls up into a cute rose! This shoe would literally take 2 minutes to make.


The possibilities are really pretty endless with these sandals. You can pretty much make and attach any fabric flower you like, or buy pre-made ones at walmart the craft store. Instead of flowers, these would look great with bows, fabric yo yos, even large decorative buttons. Can you think of anything else that would be adorable on these shoes?


They even go with fluffy baby butt, but really, what doesn't?